In case anyone does not know, BloodHound is an ops tool that allows you to visualize the relationships in Active Directory, to assess strengths and weaknesses. BloodHound helps you track relationships and get an overview of AD, identify computers where users have administrator rights, see which users are authorized to administer any computer in AD, and allows you to view group membership information. BloodHound has implemented a “think graphs, not lists” approach for the first time at this level.
It is one of the most important tools used in almost all internal penetration testing. The project is being actively developed and new features are being added.
This tool is of interest both for IS employees who study risks in Active Directory infrastructure, and for attackers, because it gives a visual graphical representation of relationships and entities in Active Directory. The tool allows you to quickly find all domain administrators; find all hosts where domain administrators are logged in; build a chain from attacker’s computer to the one with the domain administrator session and many other useful information. BloodHound is a one-page Javascript web application. A PowerShell PowerView script is used to collect data.
You can get a detailed look at this handy framework in the official repository on Github.
Just recently a new version of BloodHound came out.
The third version added three new types of attacks, improved
GUI performance was improved, and support for Neo4j 4.0 was added.
New attack types.
Three new types of attacks were added to BloodHound: GMSA management, OU management and SIDHistory. The configurations associated with these attacks are available by default to any domain-validated user, and each attack type can be used with practical tools.
GMSA management.
Group Managed Service Accounts (GMSA) are special service accounts in Active Directory that solve many problems. Passwords for GMSA consist of 128 characters, are managed by domain controllers, and are automatically changed every 30 days by default.
The point of GMSA is that administrators need to specify who is allowed to read GMSA passwords. Suppose that our user Dwight Hohnstein can read the password for SQL GMSA. In the BloodHound GUI, you can see this as an attack path from Dwight’s computer to the SQL computer:

If we can enter the DHOHNSTEIN user context, we can get the pleintext password for GMSA-SQL01, and then go to SQL01.CONTOSO.LOCAL. There are already a few tools for retrieving GMSA passwords, but none of them work solely from computer memory. That’s why we developed GMSAPasswordReader in C#, which does exactly what it is supposed to do: it reads GMSA passwords. Here is an example of using GMSAPassword.exe with Cobalt Strike’s execute-assembly function to get the NT hash for GMSA-SQL01:
Now, with the NT password hash of the GMSA account, you can impersonate the user (using, for example, overpass-the-hash) and go to SQL01.CONTOSO.LOCAL.
For further reading about GMSA, (see Michael Grafnetter’s review here)
OU Control.
Sometimes AD admins set ACEs on OUs (organizational units) applicable to an OU, or an OU and its legacy OUs, but not legacy user, computer, or group objects. We have seen control of OUs through the linking of group policies to OUs, and the ability to link unwanted GPOs to the OUs you control. There are several issues with this, the most critical of which is that you need to be able to prevent an unwanted GPO from correctly hosting your Group Policy files. Doing this through the command line is very difficult. By controlling the OU, you can set the ACE on the OU to be inherited by the nested objects!
For example, suppose Justin Bui has full access to the Workstation Admins OU, Josh Prager’s user object:
What follows is a very simple attack: from the context of the JBUI, we can add a new ACE to the workstation administrator’s OU, which inherits the JPRAGER. This is possible thanks to a powerful commandlet in PowerView New-ADObjectAccessControlEntry.
Once this new ACE is created, we can access the JPRAGER user from the JBUI context, just like we could do after updating the BloodHound 1.3 ACL: reset its password or perform a targeted attack.
When you apply ACE to an OU and set it to inherit child objects, you can choose to apply it to all objects, objects of a particular class, and even control whether it applies to direct children of the OU and their descendants.
SIDHistory.
SIDHistory is included as an attack vector in BloodHound. As a rare timer, you may first think of gold ticks breaking the SID history functionality, but what we are really looking at is users, computers, and groups that already have a SID specified in the SIDHistory parameter of their object in AD. These parameters can be populated when an object is migrated from one Active Directory domain to another. To preserve the rights and privileges that the participant has, the object in the new domain will contain security identifiers for any group to which the participant belongs in the old domain.
Suppose a Josiah Massari user object was migrated to the CONTOSO domain from the FABRIKAM domain. In the FABRIKAM domain, the user Josiah belonged to the Workstation Administrators group, which has local administrator rights on all workstations in FABRIKAM. In the CONTOSO domain, the user object for Josiah will contain the SID for the Administrators group of the workstation in FABRIKAM. Now, whenever Josiah authenticates, his Kerberos ticket will contain the SID for that group in the ExtraSID portion of the ticket’s PAC, giving him the same rights and privileges that group has.
Bottom line: Josiah Massari actually remains a member of the workstation admin group in FABRIKAM, even though his user object no longer belongs to that group. For more on this, see Sean Metcalfe’s blog: Hidden Resilience Active Directory #14: SID.
In the BloodHound GUI, the situation described would look like this:
In fact, you can represent “HasSIDHistory” in the same way you already represent the “MemberOf” property. In the context of JMASSARI you will get administrator rights on both workstations in the FABRIKAM domain.
Be warned: if the trust between the CONTOSO and FABRIKAM domains provides SID filtering, this attack will not work because the SIDs in the ExtraSID part of the JMASSARI kerberos ticket PAC will be ignored by the FABRIKAM domain. For more information on SID filtering, see Will Schroeder’s blog post, A Guide to Attacking Trusts in the Domain.
Performance Improvements.
Performance improvements over older versions are felt in two main areas: data collection with SharpHound and data import with the BloodHound GUI. In SharpHound, you will experience an increase in LDAP acquisition speed of about 25-30%. Collecting hosts is a little slower, but with much greater accuracy. The number of host recognition samples has increased significantly over the previous version.
The parsing and JSON import logic is completely overhauled, so dragging and dropping files into the GUI will work faster compared to previous versions.
Additional conveniences.
Two major changes have affected how the GUI handles complex queries, and how the GUI visualizes graphs with a large number of nodes.
Whenever you click on a node in the BloodHound GUI, the information tab for that node populates and starts displaying all kinds of information about that object:
Some of these queries are very easily handled by the database, such as getting the date and time of the “last password” from a user node, or even getting the number of computers on which a user has delegated group administrator rights.
Some of these queries are actually quite heavy, especially when you start working with databases above a certain size, say over 30,000 nodes. In particular, any use of shorttestPath (), where the start or end node can be any other node (as opposed to a specific node) in the graph, will put a huge load on the database.
There are 3 such queries performed every time you click on a user node: local administrator rights, transient object management, and transient object controllers. We changed the default behavior. Now, instead of those queries running every time you click on a user node (and thus burdening the database), there is a “play” button that you can click to run the query:
A big problem with the BloodHound GUI was the visualization of large graphs consisting of hundreds of nodes. This was because the framework relied on open-source graph visualization libraries – which use the CPU, not the GPU, for visualization.
The solution was to intercept the data returned from neo4j, determine if that much data could cause the GUI to hang for a long time, and then give the user a choice of actions:
“Cancel” will cancel yours. “Save Data” will show a dialog box where you can save the raw graph data in JSON format. “Draw Graph” will continue trying to render the nodes as usual.
BloodHound requires three sets of data from Active Directory to work:1. Who is logged in and where2. Who has administrative rights and where3. Which users and groups are in which groups. Collecting this data in most cases does not require any privileged access or code execution on remote systems. Data collection can be done via the PowerShell script PowerView, or via the SharpHound.exe utility which can be found in the Ingestors folder. I’ll take a look at the option of collecting data using SharpHound.exe.
In my example, SharpHound.exe is located in the folder C:\BloodHound\BloodHound-master\Ingestors:
Collected data is saved to CSV files in the same folder.
The documentation on working with the utility is here: https://github.com/BloodHoundAD/SharpHound
It requires .Net 3.5. Run from a domain user context.When run without parameters, it collects AD group members, trust relationships, local administrators, and current sessions. The result is printed to the CMD:
Run BloodHound.exe and connect to the database.
The data that was loaded for the example can be deleted by clicking the Clear Database button.
Then load the received CSV files into a clean database. To do this, click the Upload Data button on the right side of the tool menu:
This completes data uploading and you can start analyzing the obtained information.
BloodHound 4.0.1 – the most powerful tool for auditing AD has become even more powerful with new attack vectors and general improvements. BloodHound is the most powerful framework for learning and exploiting AD, indispensable for any self-respecting redtimer.
Bloodhound immediately provides these features:
- find accounts of all domain administrators;
- find hosts where domain administrators are logged in;
- plot the shortest path from the attacker’s host to the host with the domain administrator’s session.
The last point answers the question of which hosts an attacker needs to hack to get to the domain administrator’s account. This approach greatly reduces the time it takes to gain full control of a domain.
Information collected by bloodhound:
- Group — Performs group membership collection
- LocalAdmin — Performs local admin collection
- RDP — Performs Remote Desktop Users collection
- DCOM — Performs Distributed COM Users collection
- GPOLocalGroup — Performs local admin collection using Group Policy Objects
- Session — Performs session collection
- ComputerOnly — Performs local admin, RDP, DCOM and session collection
- LoggedOn — Performs privileged session collection (requires admin rights on target systems)
- Trusts — Performs domain trust enumeration
- ACL — Performs collection of ACLs
- Container — Performs collection of Containers;
- DcOnly — Performs collection using LDAP only. Includes Group, Trusts, ACL, ObjectProps, Container, and GPOLocalGroup
- All — Performs all Collection Methods except GPOLocalGroup and LoggedOn
- SearchForest — Search all the domains in the forest instead of just your current one
- Domain — Search a particular domain. Uses your current domain if null (Default: null)
- Stealth — Performs stealth collection methods. All stealth options are single threaded
- SkipGCDeconfliction — Skip Global Catalog deconfliction during session enumeration. This can speed up enumeration, but will result in possible inaccuracies in data
- ExcludeDc — Excludes domain controllers from enumeration (avoids Microsoft ATA flags)
- ComputerFile — Specify a file to load computer names/IPs from
- OU — Specify which OU to enumerate
The information gatherers are SharpHound.exe (requires .NET v3.5 installed) and the powershell script SharpHound.ps1. There is also a builder written by a third-party developer in Python, Bloodhound-python.
Neo4j is used as the database, which has its own syntax, allowing for custom queries. You can read more about the syntax here.
Twelve queries are available out of the box:
- Find all Domain Admins
- Find Shortest Paths to Domain Admins
- Find Principals with DCSync Rights
- Users with Foreign Domain Group Membership
- Groups with Foreign Domain Group Membership
- Map Domain Trusts
- Shortest Paths to Unconstrained Delegation Systems
- Shortest Paths from Kerberoastable Users
- Shortest Paths to Domain Admins from Kerberoastable Users
- Shortest Path from Owned Principals
- Shortest Paths to Domain Admins from Owned Principals
- Shortest Paths to High Value Targets
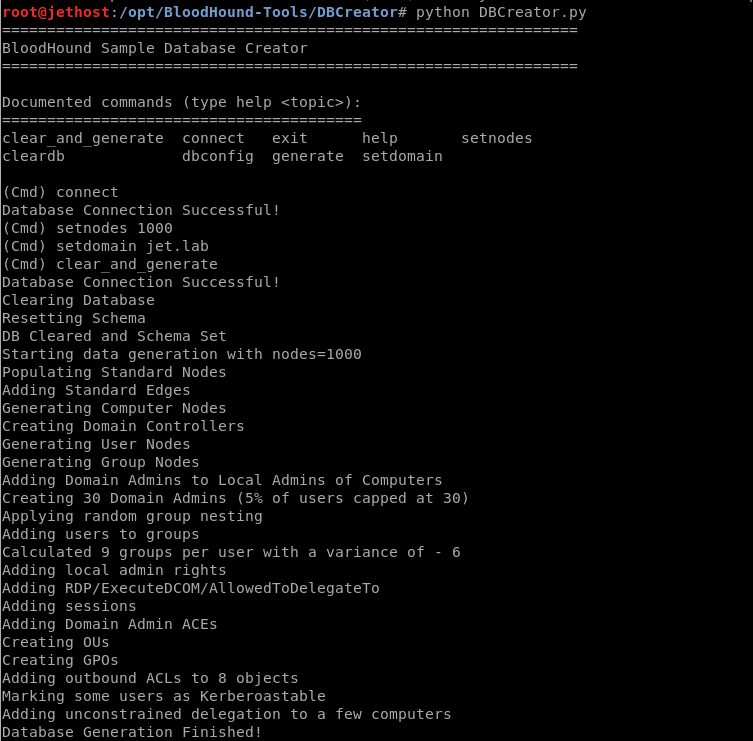
The developers also provide a DBCreator.py script that allows you to generate a random database for tests.
Neo4j has a REST API. There are various utilities that can connect to the database and use the data obtained:
Let’s look at some of them.
CypherDog.
CypherDog is a BloodHound shell written in powershell. It includes 27 commandlets.
List of commands
Examples of use
By default, authentication is required to access the neo4j database. You can disable authentication by editing the neo4j.conf file. The line dbms.security.auth_enabled=false must be uncommented. But this is not recommended, as any user will be able to connect to the database at 127.0.0.1:7474 (the default configuration). You can read more about authentication and authorization in neo4j here.
GoFetch.
GoFetch uses the graph created in bloodhound to plan and execute the attack.
Example graph in Bloodhound
GoFetch logic
Launch an attack
.\Invoke-GoFetch.ps1 -PathToGraph .\pathFromBloodHound.jsongt-generator.
gt-generator makes it easy to create golden tickets using BloodHound data. Only the username and password hash of the user KRBTGT are needed to get a golden ticket.
python gt-generator.py -s 127.0.0.1 -u user -p pass administrator <KRBTGT_HASH>
PowerView.
PowerView is a Powershell framework that is part of PowerSploit. Below is a list of some cmdlets that will help when gathering information about the domain.
List of cmdlets
Adidnsdump.
When using integrated DNS in Active Directory, any domain user can query all DNS records set by default.
Used tool: Adidnsdump.
Attacks on the domain.
Now that we have information about the domain, we move on to the next phase of penetration testing, the attack itself. Let us consider 4 potential vectors:
- Roasting
- Attack through ACL
- Kerberos delegation
- Abusing GPO Permissions
Roasting.
This type of attack targets the Kerberos protocol. Two types of Roasting attacks can be distinguished:
- Kerberoast
- Asreproast
Kerberoast.
The attack was first demonstrated by user timmedin at DerbyCon in 2014 (video). If the attack is successful, we will be able to brute-force the password of the service KM in offline mode without fear of locking the user out. Quite often, service accounts have excessive permissions and an indefinite password, which could allow us to gain domain administrator rights.
To understand the attack, let’s look at how Kerberos works.
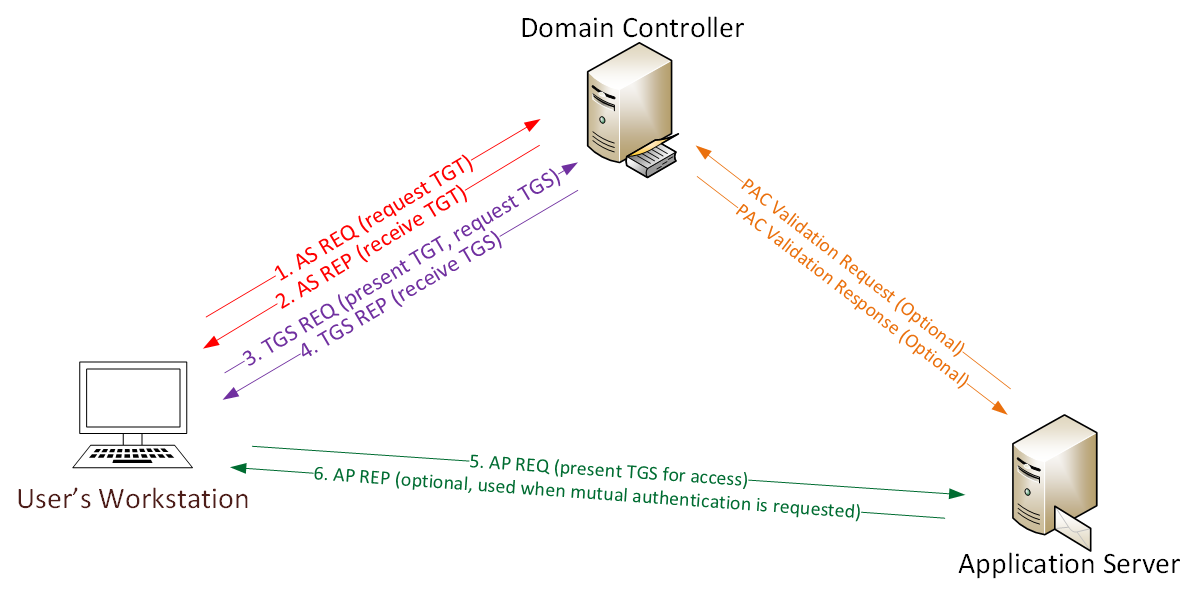
- The password is converted to an NTLM hash, the timestamp is encrypted with a hash and sent to the KDC as an authenticator in the TGT ticket request (AS-REQ). The domain controller (KDC) verifies the user’s information and creates a TGT-ticket.
- The TGT ticket is encrypted, signed and sent to the user (AS-REP). Only the Kerberos service (KRBTGT) can open and read data from the TGT-ticket.
- The user presents the TGT-ticket to the domain controller when requesting a TGS-ticket (TGS-REQ). The domain controller opens the TGT-ticket and checks the PAC checksum.
- The TGS-ticket is encrypted with the NTLM password hash of the service account and sent to the user (TGS-REP).
- The user provides the TGS-ticket to the computer running the service (AP-REQ). The service opens the TGS-ticket using its NTLM hash.
- Access to the service is granted (AS-REP).
Having received the TGS-ticket (TGS-REP), we can pick up the password of the service account in the offline mode. For example, by using hashcat.
According to RFC396, 20 encryption types are reserved for the Kerberos protocol. The encryption types currently in use, in order of priority:
- AES256_CTS_HMAC_SHA1
- AES128_CTS_HMAC_SHA1
- RC4_HMAC_MD5
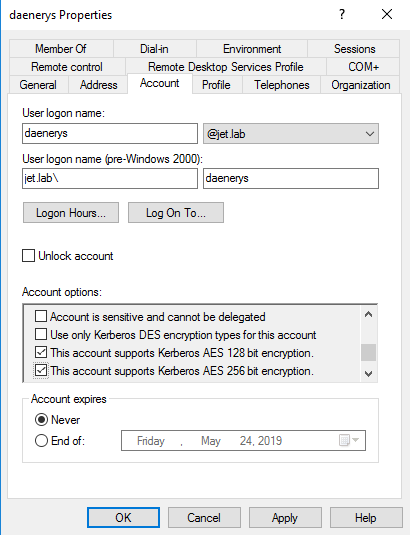
Recent versions of Windows use AES encryption by default. But for compatibility with systems below Windows Vista and Windows 2008 server, support for the RC4 algorithm is required. When conducting an attack, one always tries to get a TGS ticket with RC4_HMAC_MD5 encryption first, which allows for faster password brute-forcing, and then with the rest. Harmj0y did some interesting research and found out that if you specified only Kerberos AES128 and AES256 encryption support in the user properties, a Kerberos ticket is still issued with RC4_HMAC_MD5 encryption.
RC4_HMAC_MD5 must be disabled at domain level.
Kerberoasting attack has two approaches.
- Old method. TGS tickets are queried via setspn.exe or .NET System.IdentityModel.Tokens.KerberosRequestorSecurityToken class Powershell, extracted from memory using mimikatz, then converted to the desired format (John, Hashcat) and searched.
- New method. Machosec noticed that the KerberosRequestorSecurityToken class has a GetRequest method, which extracts the encrypted part with the password from the TGS-ticket.
Tools for performing the attack:
Tools for conducting an attack:
1) Search SPN records
- GetUserSPN.ps1
- Find-PSServiceAccounts.ps1
- Get-NetUSER -SPN.
- (Get-ADUser -Filter {ServicePrincipalName -ne “$null”} -Properties ServicePrincipalName).ServicePrincipalName
2) TGS Ticket Request
- setspn.exe (standard Windows utility)
- Requesting a ticket via powershell
Add-Type -AssemblyNAme System.IdentityModel New-Object System.IdentityModel.Tokens.KerberosRequestorSecurityToken -ArgumentList “<ServicePrincipalName>”
You can see the current cached tickets with the klist command.
Common SPN records.
3) Exporting tickets:
- Invoke-Mimikatz – Command ‘”Kerberos::list /export”‘
- Mimikatz – Command ‘”Kerberos::list /export”‘
- Invioke-Kerberoast
- tgsrepack.py
An example of automated execution of all 3 items:
Find-PotentiallyCrackableAccounts -Sensitive -Stealth -GetSPNs | Get-TGSCipher -Format "Hashcat" | Out-File kerberoasting.txt
Invoke-Kerberoast -Domain jet.lab -OutputFormat Hashcat | fl
GetUserSPNs.py -request jet.lab\user:Password
BloodHound 4.0.1 – what’s new?
With the new version came support for Azure.
A total of 10 new node types have been added:
You can see more about the innovations in this video:
For a complete list of innovations, see the official documentation:
https://bloodhound.readthedocs.io/en/latest
In addition, the graphical interface has been updated:
A new AzureHound data collector has been added.
AzureHound is a new data collector for BloodHound that specifically collects data from the Azure client and subscribers who trust that client. AzureHound and SharpHound collect data from different sources, but their output is fully compatible with each other: you can import AzureHound and SharpHound data from one database into another.
By default, any user who can authenticate with the Azure client can collect information about administrator roles, users, groups, applications, automation accounts, devices, and service entities. But by default, users do not have the ability to read information about subscriptions or anything in them:
Using AzureHound is easy. First, open a new PowerShell prompt as an administrator, install the Microsoft Azure modules, and authenticate to the target client:
Conclusion from the developers.
BloodHound is actively expanding beyond the local Active Directory, you can now use BloodHound to analyze external attack paths as well, including Azure. For blutimers, however, we hope that BloodHound’s graphical interface will offer a simpler and more effective auditing capability to fully understand which and how many owners control a particular object – or can gain control by performing an attack.
In the near future, we will actively develop Azure-related functionality, including automation accounts and, if possible, collection of user sessions from virtual machines. We are also keeping an eye out for ongoing research on Azure abuse by other community members and are always looking to add new, stable and robust attack primitives to the BloodHound graph.
Never use the methods described in the article. This article is written for informational purposes only. The author is not responsible for the application of the skills. Otherwise, you are breaking the law.